How to Set Up Hostinger Email on Outlook for Windows
- Since 2003trading in Manchester
- 20,000+UK businesses helped
- Collect M8Unit 3, 116 Bury New Road
- A personchecks every file
Talk to a real person
Our team has helped over 20,000 UK businesses. Come in, call us or we come to you.
Gather the Hostinger Email Account Details
Gather the configuration details of your email account:
IMAP (incoming)
POP3 (incoming)
SMTP (outgoing)
Host: imap.hostinger.com
Encryption: SSL
Port number: 993
Host: pop.hostinger.com
Port number: 995
Host: smtp.hostinger.com
Port number: 465
Set Up Hostinger Email on Outlook
First, make sure you have the Outlook application installed on your device.
Step 1 – Open Outlook and Start the Setup
- Open Outlook.
- Click Add Account.
- Type your full Hostinger email address (e.g. example@address.com)
- Click Continue.
Step 2: Select Account Type
Select your preferred connection type:
- IMAP (Recommended) – Syncs emails across all devices
- POP – Downloads emails to one device (deletes from original server)
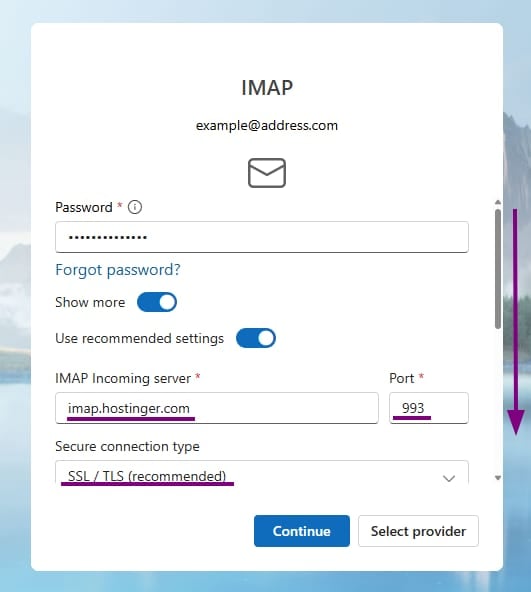
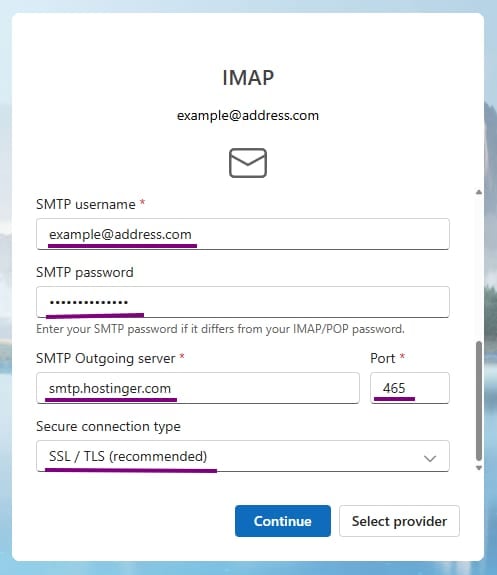
Step 3: Enter Server Settings
Fill in the server details based on your selection:
IMAP (Recommended)
- Incoming server: imap.hostinger.com
- Port: 993
- Encryption: SSL/TLS
- Outgoing server (SMTP): smtp.hostinger.com
- Port: 465
- Encryption: SSL/TLS
POP (Alternative)
- Incoming server: pop.hostinger.com
- Port: 995
- Encryption: SSL/TLS
- Outgoing server (SMTP): smtp.hostinger.com
- Port: 465
- Encryption: SSL/TLS
Use your full email address as the username, and the password you created for that emai as the password for the setup.
Step 5: Finish Setup
- Click Continue to let Outlook test the connection.
- Once the test completes, click Done.
Done!
Your Hostinger email account is now added to Outlook. You should see it in the sidebar, ready to send and receive emails.
Ready to get started?
Tell us what you need and we'll come back with an honest, fixed-price quote — no obligation.